How to fit a PVC banner to a wall. Fitting your banner correctly is an important factor for the longevity of your printed banner. A large banner is very similar to a sail on a ship, so you want to avoid it from catching the wind. If not fitted correctly, the wind can get behind the material and destroy your banner.
What is the best finish option for a wall banner?
Ideally, you’ll want the finishing option of hem and eyelets around your banner. On large mesh banners, we’d advise opting for a reinforced hem and eyelet as this option adds much-needed strengthening to the perimeter of your banner.
How do you fit a banner to a brick wall?
To fit a banner to a brick wall, you will need to erect a platform to work. When installing your banner, especially at high levels, it’s advisable to erect scaffolding at your desired working height. When fitting a banner, you’ll need two people, and on larger banners, you’ll maybe need a team of 3 or 4 to fit. Large banners can be awkward to fit and handle, so the more pairs of hand you have on installation day, the better.
To fit your banner to a brick wall, you’ll need the following items.
- Penny Washers (Large washers with small holes)
- Long screws around 50mm or longer
- Wall plugs
- SDS hammer drill and masonry bits
- Impact driver or electric screwdriver
Attach the top of your banner first.
Drill your first hole and plug the hole. Starting in the top left corner, attach your banner using a screw through the penny washer to the wall at the desired height you require (figure 1). From left to right, pull the banner tight and fix it through the next eyelet making sure the banner is straight and tensioned tightly. A fixing tip that can help keep the banner tensioned throughout is to angle the screw to the fitting direction (Figure 2). Doing this tensions the banner once the screw tightens against the eyelet pulling it taught. Working from left to right and repeat the same process on all the eyelets angling each screw to the right towards where it needs tensioning.
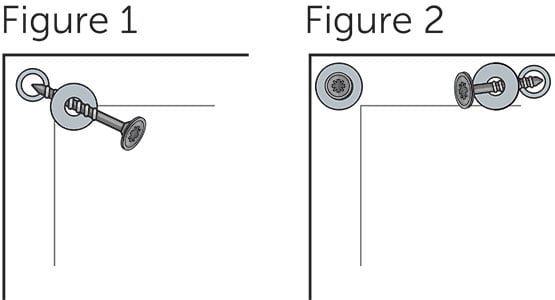
Next, attach the bottom of your banner.
Use the same process to attach the bottom eyelets and angle your screws downward to create tension. On the bottom left-hand side and right-hand side, you can angle the screws downwards and outwards, thus creating much-needed tension on the corners.
Finally, fix the sides of your banner to the wall.
Using the same process angle, you screw outwards on each side and affix to the wall. Your banner has now been installed.
How to attach a banner to metal cladding
Use the same method when attaching your banners to metal cladding. The only difference is your choice of the screw. Opt for a cladding Tek screw. Tek screws, also known as Tek bolts, have a self-drilling tip specifically designed for joining cladding. Tekscrews are available in various sizes from any DIY or hardware store and create a super strong fixing with no need for plugging. Tekscrews usually have an 8mm hex head, so you’ll need to purchase an 8mm hex adapter for your driver or impact driver.

How to get creases and wrinkles out of a banner
Properly tensioned and installed, your banner should be free from creases. Due to the dimensions, some large banners will need to be folded when shipped on a courier. Any transportation creases will fall out if properly tensioned when fitted, with any slight creasing diminishing over time. Slight rippling from uneven tensioning will reduce over time as the banner material itself will slightly shrink in the sunlight and heat, tightening and reducing rippling.


Leave a Reply
You must be logged in to post a comment.